Design Parking Manual
LOADING PROGRAM
 Start AutoCAD or IntelliCAD.
Then open windows explorer and browse to c:/Dpi
Click on the file "loadmenu.lsp" hold down and drag it into the drawing.
You should see a new pull-down menu called: Design Parking
To begin Design Parking, select it from the pull-down menu.
Or you may manually load Design Parking into your
drawing by typing at the command prompt:
(LOAD"/DPI/DPI") be sure to
use the front slash.
Or you may select "applications" from the Autocad "file" or "tools" pull-down menu. Pick the file button. Find directory DPI then select DPI.lsp. The file will then be placed in the "Files to load" box. Choose save list, this will keep the file there for future use. Click on the file to highlight it and choose LOAD. Design Parking is now loaded.
To begin Design Parking, type at the
command prompt: DP
The Design Parking dialog box will
appear.
Options dialog box:
NOTE:
Before beginning be sure to set LTSCALE
to the scale of the drawing. You may do this by typing LTSCALE at the command
prompt and entering the scale of the drawing in drawing units.
Wheel chair accessible stalls are referred to as ACCESSIBILITY stalls in this program and may be abbreviated as AC.
ENTERING
DATA
Stall angle:
Enter angle of parking, such as: 45,
60, 90 or any number between 0 and 90.
(see illustration 1 below)
Stall width:stall.
Min. stall length:
Right angle stall depth:
You may enter the minimum stall length
or the parking depth at right angles.
(see illustration 1)
Each time you change one of the above
items, Design Parking will recalculate the remaining items with the new
entry. This may be useful to you in laying out your parking lot.
Include accessibility stalls:
Choose NO for no accessibility stalls. Choose ALL if all stalls will be accessibility stalls. Choose YES if you want to add a certain number of accessibility stalls to the beginning or end of the row of stalls.
Accessibility stall width:
Enter width of accessibility stall.
Number of AC stalls to add:
Enter the number of accessibility
stalls to add to row of parking stalls.
Place AC stalls at:
Choose BEGINNING or END to place accessibility
stalls at the beginning or end of row. (see illustration 2)
Select the options button.
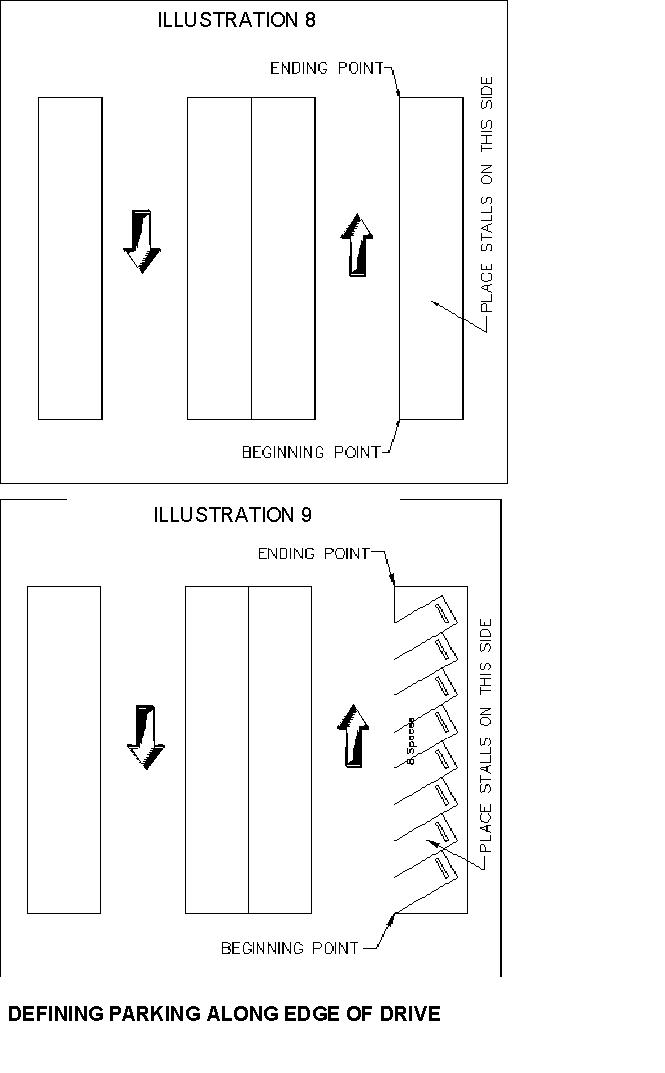
Define parking along: (Edge
of drive or Back of stalls)
To lay out a new parking lot you should
block off stall areas and define parking along edge of drive.
If you are trying to add stalls to
an existing parking lot you should define parking along back of stalls.
(see illustration 3 below)
Define along Back of stalls
Define along Edge of Drive
ILLUSTRATION 3
Place perpendicular
line at end of stall:
Select YES to place a line at the
end of the parking stall perpendicular to the stall.
Select NO to place the line parallel
to drive. (see illustration 4 below)

ILLUSTRATION 4
Insert parking
blocks:
Select YES to insert parking blocks
at each stall. Select NO for no parking blocks.
Width of hatched portion of AC stalls:
 You
may define a portion of the accessibility stall to be hatched. The hatch
lines will be drawn at 45 degrees to the stall. Enter the width of the
hatched portion of the stall. If you do not want to hatch a portion of
the stall, enter 0 for no hatch. (see illustration 5)
You
may define a portion of the accessibility stall to be hatched. The hatch
lines will be drawn at 45 degrees to the stall. Enter the width of the
hatched portion of the stall. If you do not want to hatch a portion of
the stall, enter 0 for no hatch. (see illustration 5)
If you do not want to hatch a portion of the accessibility stall, enter 0 for width of hatch.
Space between
hatch lines:
You may define the spacing of the
hatch lines in the accessibility stall.
Place hatch on which side of stall:
Choose RIGHT to place hatch on right
side of stall. Choose LEFT to place hatch on left side of stall.
Place sign symbol at AC stalls:
Choose YES to place a sign symbol
at accessibility stalls. Choose NO for no sign symbol.
Choose DRAW RADIAL STALLS to draw radial stalls and save settings.
Choose DRAW STALLS to draw stalls and save settings.
Choose CANCEL to discard settings.
Choose TABULATE to tabulate the number of parking stalls in the drawing.
Settings are saved for each drawing
in a file called "dwgname".lot.
DRAWING RADIAL STALLS
Design Parking will use the min. stall
width and min. stall length to create radial stalls. Select the center
of curve, the start point for stalls and the end point (not to exceed).
Be sure to specify whether you are defining stalls from edge of drive or
from back of stalls.
DRAWING STALLS
Before you begin drawing stalls, You
will need to lay out the parking lot into stall bay areas.
(see illustration 6)
ALIGNING STALLS IN DOUBLE STALL BAYS
To align stalls in double stall bays,
first create a row of stalls. Then extend a stall line to the other side.
This will be the beginning point of the next row (see illustration 7 below).
Use these boundaries to create duplicate stall bays.
Select the draw button.
Stalls will be
drawn in the direction that you are driving through the parking lot. Be
sure to choose "Define parking along : Edge of drive". Select
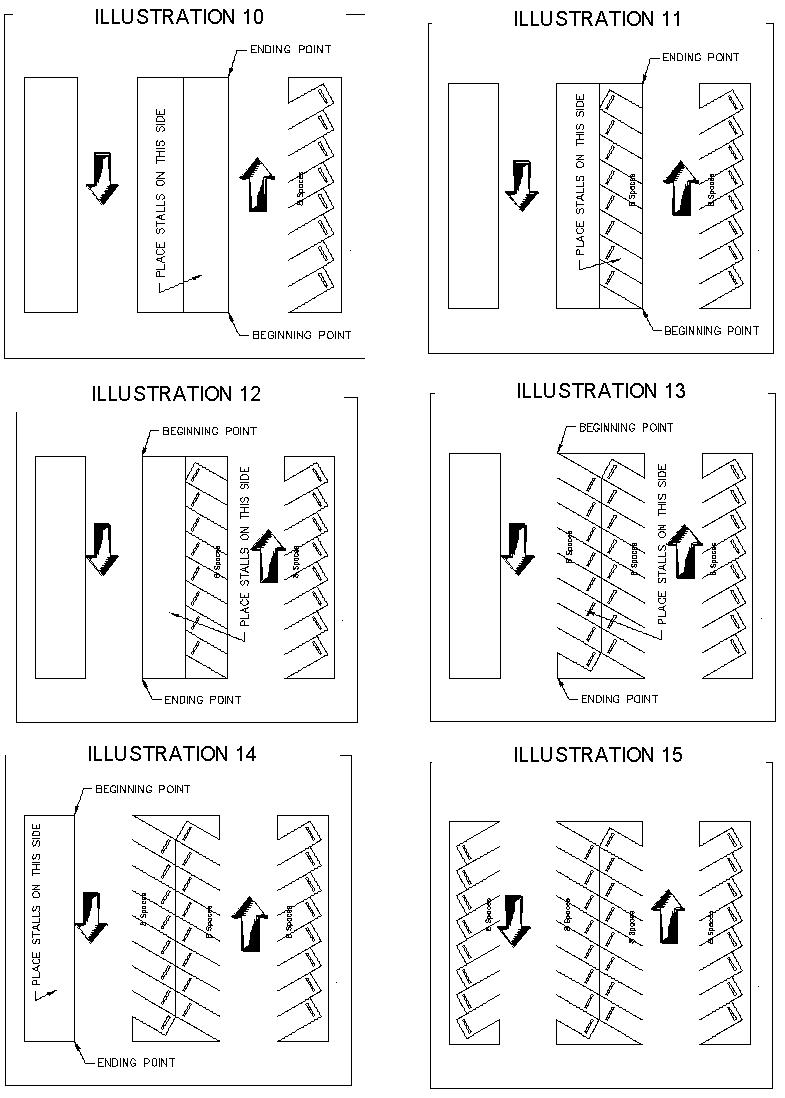
the beginning point (see illustration 8). Select the ending point (see
illustration 8). Select a point to show Design Parking which side to place
stalls (see illustrations 8 thru 15).
When you are through drawing stalls,
click the enter button. The Design Parking dialog box will re-appear. You
may change the settings and continue to draw stalls, or you may choose
cancel to quit.
LAYERS
The wheel chair symbol may be frozen by freezing layer WHEEL_CHAIR_SYM.
The parking blocks may be frozen by freezing layer PARKING_BLOCKS.
The accessibility sign symbol may be frozen by freezing layer AC_SIGN_SYMBOL.
The number of spaces may be frozen
by freezing layer DPSTALL_TAB.
TABULATE STALLS
To tabulate stalls select the tabulate button. Design Parking will then add all of the blocks containing number of stalls. At the command line Design Parking will print the number of standard parking stalls, the number of accessibility stalls and the number of total parking spaces.
NOTE:
The blocks containing the number of
stalls are necessary for Design Parking to tabulate the total number of
stalls. You may freeze the layer they are on but do not erase them.
If you make manual changes to the
parking lot, you must update the number of stalls listed in the block.
You may do this by typing DDATTE at the command prompt and selecting the
block you want to edit. Type in the correct number of spaces. Press OK.
If you add a row of stalls manually, just copy one of the blocks containing stall numbers (or AC stall numbers) and place it on your new row. Edit it as shown above with the correct number of spaces.
Note: If you do not see the parking stall tabulation blocks on your drawing, the LTSCALE setting needs to be set to the scale of your drawing.