
Land Surveying and Land Development Software for Land Surveyors, Engineers, Architects and Construction
Annotate Line Tutorial
THIS IS A TUTORIAL TO ANNOTATE A LINE.
From the pull down menu select: Drafting-- Drawing setup
Select units English or Metric: (E or M) M
Enter ratio of drawing 1: 500
Text size has been set to 3mm
You can label the Azimuth or Bearing and/or distance of a line by just picking the line.
You can also label the Azimuth or Bearing and/or distance of a line by picking two points.
Here is an example of both.
You may download this drawing to use: Drawing
Look at this drawing and the following instructions to place annotation.
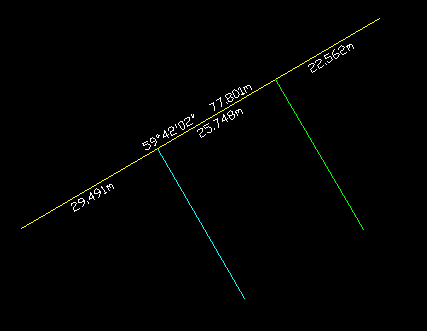
FIRST WE WILL LABEL THE YELLOW LINE
The label will appear above the line.
From the pull down menu select: Labels--Label lines AZN--Azn Dist /
Select line to label: Select the yellow line (select the lower left end of the line-
Select line to label: Press enter to end (or right mouse click-.
NOW SET THE ENDPOINT OBJECT SNAP
Command: ENDPOINT
NOW WE WILL LABEL THE SEGMENTS ALONG THE LINE
The label will appear below the line.
From the pull down menu select: Labels--AZN point to point--/ Dist
Select starting point: Select the lower left endpoint of the yellow line.
Select end point: Select the endpoint of the cyan line the intersects the yellow line.
Select end point: Select the endpoint of the green line the intersects the yellow line.
Select end point: Select the upper right endpoint of the yellow line.
Select end point: Press enter to end (or right mouse click).
Select starting point: Press enter to end (or right mouse click).
Copyright © 2025 CogoSoftware. Powered by Zen Cart